Yanagiba: The Sashimi Knife and Why It Matters for Japanese Cuisine
In Western cuisine, you slice fish with whatever sharp knife you have — a chef's knife, a slicing knife, a fillet knife. The idea of owning a knife that does nothing but slice raw fish sounds absurdly specialized.

Quick Answer
- The yanagiba (柳刃包丁) is the definitive sashimi knife — a long, single-bevel blade designed to cut fish in one continuous pull stroke, preserving the cellular structure that gives sashimi its clean flavor and glossy surface
- Professional sushi chefs use yanagiba from 270mm to 360mm, while home cooks should start at 210–240mm — blade length matters because the entire cut must happen in a single pull, and a short blade forces multiple strokes that tear rather than slice
- The knife originated in Osaka and Kansai cuisine culture, where it's sometimes called *shobu* (菖蒲, iris leaf) for its resemblance to the plant — it displaced the Kanto region's rectangular *takohiki* (蛸引) to become the dominant sashimi knife nationwide
- Blue Steel #2 (Aogami #2) is the most popular professional yanagiba steel, chosen for its balance of edge retention, ease of sharpening, and ability to achieve the extreme sharpness required for clean fish cuts — though White Steel and stainless options exist at different price points
Why a Dedicated Sashimi Knife Exists
Source: Hocho-Knife.com
In Western cuisine, you slice fish with whatever sharp knife you have — a chef's knife, a slicing knife, a fillet knife. The idea of owning a knife that does nothing but slice raw fish sounds absurdly specialized.
In Japanese cuisine, it's non-negotiable.
Here's why: sashimi is served raw. There's no sauce, no seasoning (beyond minimal soy and wasabi), no cooking to mask imprecision. The quality of the cut is the dish. When you slice a piece of tuna with a dull or inappropriate knife, the cells are crushed rather than severed. Crushed cells release moisture (drip loss), creating a wet, mushy texture. The cut surface appears matte and rough. The flavor compounds degrade.
When you slice the same tuna with a properly maintained yanagiba in a single, smooth pull, the cells are severed cleanly. Moisture stays inside the flesh. The surface is glossy — almost mirror-like. The flavor is cleaner, brighter, more alive.
Jikko (堺實光) explains: "The yanagiba was designed so that the blade can pass through fish in a single stroke without applying downward pressure, cutting the fibers cleanly rather than tearing them. This difference is visible and tasteable in the finished sashimi" (Source: jikko.jp, "Difference Between Sashimi and Yanagiba Knives").
This guide draws on Japanese-language sources from Ichimonji Mitsuhide (堺一文字光秀), Jikko (堺實光), KOHNO, Honmamon, Tokubai News, Sakidori, and professional chef resources to cover everything about the yanagiba — from history and design to selection, technique, and care.
Anatomy of the Yanagiba
Blade Design
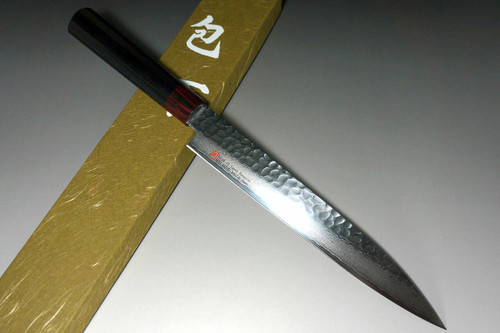
The yanagiba is a single-bevel (kataba, 片刃) knife with a narrow, elongated blade that tapers to a sharp point. The blade shape resembles a willow leaf (yanagi no ha, 柳の葉) — hence the name.
Blade length: 210–360mm. Professional standard is 270–300mm. Home use: 210–240mm. Blade width: Narrow — approximately 30–35mm at the heel, tapering to the point. Blade thickness: Thin at the edge, thicker at the spine. The spine tapers from approximately 3–4mm at the heel to under 1mm near the tip. Cross-section: Asymmetric. The right side (omote, 表) carries the bevel — a flat plane ground at approximately 10–15 degrees from the edge to a ridge line (shinogi). Above the shinogi, the blade angles outward toward the spine. The left side (ura, 裏) is nearly flat with a slight concavity (urasuki). Weight: 130–200g for 240mm; 180–280g for 300mm. Light for its length.
Why Single-Bevel Matters for Sashimi
The single-bevel grind is the engineering core of the yanagiba. Here's what it does:
One-directional cutting: The bevel on the right side creates a wedge that pushes the knife away from the food being cut. The flat left side glides along the cut surface without disruption. This means the slice separating from the block maintains a perfectly smooth surface — no drag marks, no tearing.
Food release: Because the left face is flat (or slightly concave), the cut slice doesn't adhere to the blade. It falls away cleanly. With a double-bevel knife, the V-shaped grind pushes food outward from both sides, which can distort thin slices.
Extreme sharpness at the edge: A single bevel concentrates all the sharpening geometry on one side, allowing a more acute edge angle than a double-bevel knife ground to the same total inclusive angle. KOHNO describes this as "the single-bevel advantage — the ability to achieve razor-level sharpness that cleanly severs fish fibers rather than crushing them" (Source: kohno-onlineshop.com, "Yanagiba Knife Guide").
History: From Osaka to the Nation
Kansai Origins
The yanagiba is a product of Kansai cuisine culture — specifically Osaka and Kyoto, where the preparation and presentation of raw fish evolved into a refined art form. Osaka's proximity to the Seto Inland Sea provided an abundance of fresh seafood, and the city's merchant culture demanded aesthetic precision in food presentation.
The knife's alternative name, shobu (菖蒲), comes from its resemblance to the iris leaf — a plant associated with the Boys' Day festival (now Children's Day, May 5). The pointed, elegant profile of the yanagiba mirrors the iris blade's long, tapered shape.
Sakai, located just south of Osaka, became the dominant production center for yanagiba knives and remains so today. The Sakai Cutlery Commerce and Industry Association (Sakai Hamono Shoko-gyo Kyodo Kumiai Rengokai) identifies the yanagiba as one of Sakai's core professional knife types, with approximately 90% of professional-grade single-bevel knives in Japan originating from the city (Source: sakaihamono.or.jp).
The Takohiki: Kanto's Answer
Eastern Japan — centered on Tokyo (then Edo) — developed its own sashimi knife: the takohiki (蛸引包丁), literally "octopus puller." The takohiki has a rectangular, blunt-tipped blade that contrasts sharply with the yanagiba's pointed profile.
The design differences reflect regional cutting traditions:
- Yanagiba (Kansai): Pointed tip for detail work and angled cuts. The taper allows the chef to adjust the cutting angle continuously along the stroke.
- Takohiki (Kanto): Square tip suited to the straight, decisive pull-cuts favored in Edo-period fish markets. A well-known folk explanation holds that Edo's takohiki was deliberately blunt-tipped so quarrelsome Edokko (Edo residents) couldn't use it as a weapon.
KOHNO notes that "the takohiki's flat tip is particularly effective for usuzukuri (thin-slicing) techniques, where the blade is drawn in a perfectly straight line" (Source: kohno-onlineshop.com).
Modern Dominance of the Yanagiba
Today, the yanagiba has won. Even in Tokyo, the yanagiba outsells the takohiki by a wide margin. Ichimonji Mitsuhide (堺一文字光秀) notes on their sashimi knife page: "In recent years, the yanagiba has become the standard sashimi knife nationwide, including in Kanto. The pointed tip provides versatility for decorative cutting and fine detail work that the takohiki's flat profile cannot match" (Source: ichimonji.co.jp, "Sashimi Knife Guide").
The takohiki survives primarily among traditionalist Edomae sushi chefs and as a collector's item, but it's no longer the mainstream choice even in its home region.
Cutting Technique: The Pull Stroke (Hiki-Kiri)
The Fundamental Motion
The yanagiba is designed for a single, continuous pull stroke (hiki-kiri, 引き切り). This is not a push, not a back-and-forth sawing motion, and not a downward chop.
The technique:
- Position the block of fish on the cutting board, with the far edge aligned where you want to begin cutting
- Place the heel (base) of the yanagiba against the far edge of the fish
- Draw the blade toward you in one smooth, continuous motion — heel to tip — while allowing the blade's weight and sharpness to do the cutting. Do not press down.
- The slice separates as the blade passes through. The tip exits the fish last.
KOHNO's yanagiba guide emphasizes: "The key is to use the full length of the blade in a single stroke. Place the blade root against the ingredient, then pull toward yourself in one motion. Never push the blade back and forth — this tears the fish fibers and ruins the sashimi surface" (Source: kohno-onlineshop.com).
Why Blade Length Matters
This technique explains why professional yanagiba are so long (270–360mm). The entire cut — from entry to exit — must happen in one pull. If the blade is too short for the width of the fish block, the chef is forced to make multiple strokes or saw, which:
- Creates visible lines on the cut surface where strokes overlapped
- Crushes cells at the re-entry points
- Produces ragged edges instead of clean faces
Tokubai News quotes professional chef guidance: "For home use, a 210–240mm yanagiba is sufficient for common sashimi blocks. But professionals cutting whole fish sides need 270mm or longer to complete the cut in a single stroke" (Source: tokubai.co.jp, "Yanagiba Selection Guide").
Honmamon provides specific recommendations: "Select your yanagiba length based on the size of fish you typically work with. 210mm handles most store-bought saku (sashimi blocks). 270mm is necessary for whole sides of medium fish. 300mm+ is for professional use with large fish like tuna and yellowtail" (Source: honmamon.jp, "Yanagiba Knife Guide").
Beyond Sashimi: Other Uses
While designed for sashimi, the yanagiba's length and sharpness make it useful for:
- Skin removal (kawa-hiki): Drawing the blade between fish flesh and skin
- Thin meat slicing: The pull-cut technique works excellently on roast beef, ham, and smoked salmon
- Cutting soft, fragile foods: Tofu, ripe fruit, delicate pastries — anything that crushes under pressure benefits from the yanagiba's weightless pull-cut
- Bread slicing: The long blade and thin profile actually work well on bread, though dedicated bread knives are more practical
Dinos describes the yanagiba's versatility: "Beyond sashimi, the yanagiba is used for skin removal, thin meat slicing, and cutting soft or delicate items that would be damaged by pressure — the pull-cut technique preserves integrity in fragile foods" (Source: dinos.co.jp, "Yanagiba Knife Guide").
Choosing a Yanagiba: Steel, Size, and Budget
Steel Selection
The steel choice for a yanagiba follows the same fundamental framework as other Japanese knives, but with one critical emphasis: edge sharpness matters more here than for any other knife type, because the yanagiba's entire purpose is to make the cleanest possible cut.
White Steel #2 (白紙二号 — Shirogami #2): Pure carbon steel with excellent sharpness and easy sharpening. The entry point for professional-grade yanagiba. Achieves HRC 60–63. Recommended for home users who want to experience true single-bevel performance. Sharpens easily on standard whetstones.
White Steel #1 (白紙一号): Higher hardness (up to 65 HRC) and finer edge than #2, but more brittle. Used by experienced professionals who sharpen frequently and value maximum sharpness.
Blue Steel #2 (青紙二号 — Aogami #2): The professional workhorse. Adds tungsten and chromium to the white steel formula for improved edge retention without sacrificing much sharpness. Ichimonji Mitsuhide identifies Blue #2 as "the most popular professional yanagiba steel — it holds sharpness through long sashimi prep sessions better than white steel while remaining responsive to whetstones" (Source: ichimonji.co.jp).
Blue Steel #1 and Blue Super: Maximum edge retention in carbon steel. Used by chefs who cut very high volumes and want the longest possible interval between sharpenings. See our complete steel guide for detailed comparisons.
Stainless options (Ginsan/Silver #3, Molybdenum): Available for users who prioritize low maintenance. Functional for home sashimi prep but generally considered inferior to carbon steel for the precise sharpness yanagiba technique demands. KOHNO notes that "stainless yanagiba are suitable for home use and beginners, but professionals predominantly choose carbon steel for the superior edge quality" (Source: kohno-onlineshop.com).
Size Guide
| Yanagiba Length | Best For | User Level |
|---|---|---|
| 210mm | Small sashimi blocks, home use, limited space | Beginner / home cook |
| 240mm | Standard home sashimi, medium fish prep | Home cook / enthusiast |
| 270mm | Professional sushi bar, whole fish sides | Professional entry |
| 300mm | High-volume professional, large fish (tuna, hamachi) | Experienced professional |
| 330–360mm | Specialty/large-format sushi, tuna breaking | Master level |
Ichimonji Mitsuhide's sizing guide recommends: "For first-time buyers, 240mm offers the best balance of usability and capability. It handles most home sashimi tasks while giving you enough blade length to learn proper pull-cut technique" (Source: ichimonji.co.jp).
Handle Selection
Yanagiba handles are exclusively wa-style (traditional Japanese). The standard configuration:
- Shape: D-shape (shinogi) — the flat side indicates blade orientation, critical for the precise angle control required in sashimi cutting. See our handle guide for details.
- Wood: Ho (朴) for standard models, ebony (黒檀) for premium. The material primarily affects aesthetics and weight, not function.
- Ferrule: Water buffalo horn (suigyuu) for professional models, plastic for entry-level.
Price Expectations
| Tier | Price Range | What You Get |
|---|---|---|
| Entry | ¥5,000–¥12,000 | Stainless or White #2, ho wood handle, machine-assisted grinding. Functional for home use. |
| Mid professional | ¥12,000–¥30,000 | Blue #2, buffalo horn ferrule, hand-finished in Sakai. Professional quality. |
| High professional | ¥30,000–¥60,000 | Blue Super or White #1, premium handle, master sharpener finishing. |
| Artisan / honyaki | ¥60,000–¥300,000+ | Mono-steel (honyaki) construction, named smith, museum-grade polish. Heirloom pieces. |
KOHNO's luxury yanagiba guide features high-end options from brands like Suisin, Masamoto, and Sakai Takayuki in the ¥30,000–¥100,000+ range, noting that "a true honyaki yanagiba represents the pinnacle of Japanese knife craftsmanship" (Source: kohno-onlineshop.com, "Luxury Yanagiba Recommendations").
Honyaki vs. Kasumi: Construction Methods
Kasumi (霞 — "Mist")
The standard construction for most yanagiba. A hard steel core (hagane) is forge-welded to a softer iron body (jigane). The boundary between the two metals creates a visible line (shinogi) that gives kasumi knives their distinctive cloudy/misty appearance when polished.
Advantages: More forgiving — the soft iron absorbs shock and makes the knife less prone to cracking. Easier to sharpen. More affordable. The dual-metal construction is what most professional chefs use daily.
Honyaki (本焼 — "True-Fired")
A yanagiba made from a single piece of steel — no soft iron backing. The entire blade is hardened carbon steel. This is the equivalent of making a Japanese sword (nihonto) in knife form.
Advantages: Perfectly uniform steel means potentially finer, more consistent edge. Higher prestige.
Disadvantages: Extremely brittle — a single mistake (dropping, lateral force, improper sharpening) can crack the blade irreparably. Significantly more expensive. Requires expert-level sharpening skill.
Honyaki yanagiba are status objects as much as functional tools. Ichimonji Mitsuhide describes them as "the highest expression of the knifemaker's art — a test of the smith's ability to control heat treatment across a single piece of steel" (Source: ichimonji.co.jp).
Maintaining Your Yanagiba
 Source: Hocho-Knife.com
The yanagiba demands the most rigorous maintenance of any kitchen knife because its performance depends on an extremely fine, precisely ground edge.
Daily Care
- Rinse immediately after cutting fish — fish oils, blood, and salt accelerate rust on carbon steel
- Wash with mild soap and a soft sponge. Run the sponge along the blade (heel to tip), never across the edge.
- Pour hot water over the blade to evaporate residual moisture (the Tsukiji Masahisa method)
- Dry thoroughly with a clean, soft cloth — both sides, the spine, and the choil junction
- Apply camellia oil to the blade before storing
- Store in a saya (wooden blade sheath) or individual blade guard
For comprehensive care details, see our maintenance guide.
Sharpening: Single-Bevel Technique
Sharpening a yanagiba is more complex than sharpening a double-bevel knife. The asymmetric geometry must be maintained precisely:
Front face (omote):
- Sharpen on a #1000 whetstone at the existing bevel angle (approximately 10–15 degrees)
- Use the full length of the stone, drawing the blade from heel to tip
- Maintain consistent angle throughout — wobbling creates an uneven bevel
- A burr (kaeri) will form on the back face
Back face (ura):
- Lay the blade flat against the stone
- Use very light pressure — 2–3 gentle strokes only
- The goal is to remove the burr, NOT to grind the back face
- The ura must remain concave (urasuki) — over-sharpening the back destroys this concavity
Finishing:
- Move to a #3000–#6000 finishing stone
- Repeat the same process: front face at angle, back face flat with minimal strokes
- Professional chefs often finish on a #8000+ stone for the mirror-polish edge that defines premium sashimi cutting
Ichimonji Mitsuhide's sharpening guide for yanagiba warns: "The most common mistake is pressing too hard on the ura (back face). The back should be touched only enough to remove the burr. If the ura becomes flat, the knife loses its cutting characteristics and must be sent to a professional for re-grinding" (Source: ichimonji.co.jp, "Yanagiba Sharpening Care").
The Yanagiba in Professional Japanese Cuisine
The Sushi Bar (Sushi-ya)
In a sushi bar, the yanagiba is the most-used knife. The itamae (sushi chef) uses it for:
- Slicing sashimi (sashimi-biki)
- Cutting sushi rolls (maki-zushi)
- Portioning neta (sushi toppings) from fish blocks
- Detail work on garnishes
A professional sushi chef may make 500–1,000+ pull-cuts per service. This is why edge retention matters so much in professional yanagiba steel selection, and why sharpening is a daily ritual performed before service begins.
Kaiseki Cuisine
In kaiseki (traditional multi-course dining), the yanagiba's role extends beyond sashimi to include:
- Sogi-giri: Angled cuts that create parallelogram-shaped slices for artistic plating
- Hira-zukuri: Standard rectangular sashimi cuts
- Usu-zukuri: Paper-thin translucent slices (used for whitefish like hirame/flounder)
- Ito-zukuri: Thread-thin cuts for delicate fish
Each technique demands precise blade angle control — something the yanagiba's single-bevel construction and long blade facilitate.
Common Mistakes with the Yanagiba
Cutting Technique Errors
- Sawing back and forth: The number one mistake. The yanagiba cuts in one direction only — pulling toward you. Pushing forward tears the fish.
- Pressing down: Let the blade's weight and sharpness do the work. Downward pressure compresses the fish and distorts the cut.
- Using too short a blade: If you can't complete the cut in a single stroke, the blade is too short for the task. Either switch to a longer yanagiba or cut narrower blocks.
- Cutting bones: The yanagiba's thin, single-bevel edge is extremely fragile. Contact with bones — even pin bones — can chip the edge. Remove all bones before slicing sashimi.
Maintenance Errors
- Sharpening the ura too aggressively: Destroys the concavity that makes the knife work
- Using a pull-through sharpener: Destroys single-bevel geometry instantly
- Storing without oil: Carbon steel yanagiba rust faster than most knives because fish residue (salt, proteins) is especially corrosive
- Not sharpening often enough: A slightly dull yanagiba produces visibly inferior sashimi — the difference is dramatic
Frequently Asked Questions
Do I need a yanagiba for making sashimi at home?
Technically, no — a sharp gyuto or santoku can slice sashimi-grade fish adequately for home meals. But if you buy and prepare whole fish or sashimi-grade blocks regularly, a yanagiba transforms the experience. The difference in cut quality is visible: cleaner faces, less drip loss, better texture. A 210mm entry-level yanagiba (¥5,000–¥10,000) is a worthwhile investment if sashimi appears on your table even once a month.
What length yanagiba should a beginner buy?
240mm is the consensus recommendation from both Ichimonji Mitsuhide and Tokubai News. It's long enough to execute proper pull-cuts on standard sashimi blocks (typically 150–200mm wide) in a single stroke, while remaining manageable in a home kitchen. 210mm works for smaller blocks but limits your capability. Avoid 270mm+ as a first yanagiba unless you have professional training — the length requires practiced technique to control.
Left-handed yanagiba — do they exist?
Yes, but they're specialty items that cost more and have limited availability. Standard yanagiba are right-handed (bevel on the right side). Left-handed models reverse the bevel to the left side, which requires dedicated manufacturing. Major Sakai producers like Ichimonji Mitsuhide and Jikko offer left-handed yanagiba, typically at a 10–20% premium. Order early — they're usually made to order rather than stocked.
Why is a yanagiba so much more expensive than a gyuto of the same length?
Single-bevel construction demands more skill and time than double-bevel. The front face must be ground to a perfectly flat plane across the entire blade length — any warping or unevenness ruins the knife. The ura (back face) must be carefully concaved. And the final sharpening is done by a specialized togishi (sharpener) rather than the smith who forged the blade. In Sakai's production system, the yanagiba passes through more specialist hands than any other knife type. The labor-intensive process accounts for the price premium.
Can I use a yanagiba for cutting vegetables?
You can, but you shouldn't make it a habit. The yanagiba's narrow blade and single-bevel grind don't provide the flat cutting surface that vegetable work demands. More importantly, the thin, acute edge is optimized for soft protein — contact with hard vegetables (carrots, squash) can chip it. Use a nakiri or usuba for vegetables and reserve the yanagiba for what it was born to do: fish.
Related Reading
- Nakiri vs. Usuba: Japanese Vegetable Knives Explained
- Japanese Knife Steel Guide: Shirogami, Aogami, and VG-10 Explained
- Sakai vs. Seki vs. Echizen: Japan's Three Knife-Making Capitals
— The Blade & Steel Team